Leave a comment

Snail Trek

I have released a series of four short episodic games in the same style as my main project (Cascade Quest). The games are called Snail Trek, and are available on Steam. Follow the story of a crew of intrepid snails as they search for a new home world!

These games show off the parser-based retro game framework I’ve developed. Some of the technical stuff:

  • the parser has auto-suggest and auto-correct
  • the parser is context sensitive to the player’s current location
  • no puzzle dead ends
  • autosaves
  • still lots of Sierra-style deaths!

Please go check them out!

SS_0002_Layer 7.jpg


Leave a comment

Speech recognition for adventure games

On linkedin, Someone posted a link to an example of Unity’s speech recognition API for Windows 10. It sounded simple to set up, so I decided to try it out. I’d done some basic research a while back to see if speech input might be an decent alternative to the text parser input in Cascade Quest.

With Unity 5.5 and Windows 10, it was just a matter of minutes before I had something very basic working.

With the Unity APIs, there are basically three ways to configure speech input:

  • A dictation recognizer, which can recognize general phrases. This requires internet connectivity though, and so it probably not suitable for the quick responses needed for a game.
  • A keyword recognizer, which simply recognizes single words (or series of words) from a fixed list. This is also not very useful for Cascade Quest, since I need to be able to recognize natural language, like the text parser can.
  • A grammar recognizer, which is provided a list of grammar rules to base its output on. This is really the only viable solution for me.

Unfortunately the grammar needs to be in the form of an SRGS XML file. This isn’t ideal, since I’m constructing the grammar (including the words to be used) from data available at runtime.

There were two main challenges to overcome:

  1. Turning the actual grammar rules into SRGS.
  2. “Cleaning” the word list so it can be used in the grammar.

The grammar

The form the text parser grammar was in was challenging to convert to SRGS. To add the problem, there is no way to debug issues with a broken grammar.

The API takes an xml file, loads it and then either works or doesn’t. It gives no indication if the SRGS is invalid, or if something just isn’t recognized. There are no errors or status (other than “everything is ok, I’m running”). On top of that, if a grammar is loaded that is invalid, all future attempts with a correctly-functioning grammar will also fail to work (until Unity is closed and restarted). I don’t know if this is a problem with the underlying Windows APIs or how Unity uses them. Nevertheless, it made it extremely tedious and (until I figured out what was going on) confusing to debug.

In the end, I ended up having to hand-code some reasonable grammar, increasing the complexity bit by bit and always testing it still worked.

The words

The next issue is the words- or specifically, the transformations of the words (pluralizing, adding -ing or -ed, etc…). My game has rules for modifying the suffixes of words, but they work from completed text input back to a known word. For example, postmen is converted to postman, which is a known word. Likewise, wolves would be converted to wolf. We check the suffix of the word, and if it is a known plural suffix, we convert it to the singular form and validate that it is a known word.

The speech recognizer grammar needs to include all variations of a word, but that means going in the other direction: from the singular to the plural (or root to transformed). For “wolf”, we would generate a number of options: wolves, wolfs, wolfes. All these are valid transformations based on our suffix rules. But not all of them are real words. So to validate these transformations, we need to check against a master English word list. I found one online that contained about 500,000 words (including plurals, verb tenses, and such).

The result

The end result is something that works “ok”. I’m sure it would be a lot more accurate if I could limit the grammar only to words that are included in the current loaded room (or at least weight those words more highly). I could do that, but I would need a different SRGS XML file for each room in the game. Even that isn’t a great solution though, because other pieces of logic in the game (which respond to text parser input) might be loaded or unloaded dynamically.

Anyway, speech recognition as an input method for Cascade Quest is something I’ll keep in my back pocket as a possibility.

How does it actually feel to play? “Ok”. I found it got tiring speaking to the game for very long. Would anyone actually use it? If I get it into a more reliable state, maybe I’ll do some playtesting to find out.

2 Comments

Adventure game puzzle design

By “adventure game”, I really mean any story-based game.

This is post is mainly just a dump of useful links regarding puzzle design, so I can have them all in one place. There won’t be anything terribly elucidating here, just links to useful articles.

I think there are some more, but I’ve lost them.

Right now I’m trying to apply this kind of puzzle theory more rigorously to Cascade Quest. Many puzzles in their current form in the game are woefully unsatisfactory, as has been demonstrated by some playtesting.

Right now I’m trying to polish up the puzzles in the first zone of the game. One thing I’m struggling with is trying to make the puzzle tree more “bushy”. What that boils down to (if you read some of the articles listed above), is trying to give the player several things to do at any particular time. A strictly linear puzzle progression can lead to player frustration if they can’t solve the current puzzle they’re working on, and have nothing else to do.

I’ve managed to make many of the puzzles have multiple independent conditions that need to be met. However, I’m running into problems informing the player of the necessary conditions. Usually there is one obvious thing the player needs to do to solve a puzzle. When they accomplish that, they may only then find that they need something additional. The end result is that the player will probably still progress linearly through the game (and possibly get blocked).

This is more of a narrative problem, I suppose. The puzzle dependency graph may be “bushy”, but the in-game narrative still drives the player through a linear discovery. I haven’t seen much discussion of this in any of the articles I linked, but it’s become a problem with nearly every puzzle to which I’ve added multiple pre-conditions.

One good example of this kind of being glossed over are the GDC slides I linked above. One example they give for “bushifying” the puzzle tree involves opening a chest. You need a key to do so. To add an additional pre-condition, we can say that the chest has rusty hinges, and so you also need a can of oil. The player now has two things to do to occupy their time.

However, how do you deliver that narrative? The player won’t realize the chest has rusty stuck hinges unless they already have the key and have tried to open the chest. So this attempt at parallelizing the puzzle tree risks becoming simply a longer linear chain in the tree.

So these are the kinds of things I’m thinking about right now.


Leave a comment

Deeply-nested coroutines in Unity

In Unity, coroutines are essentially methods that execute across several frames. They are, in a sense, some syntactic sugar that lets you avoid having to keep track of the state of a sequence of operations (for instance, fading from one color to another) in member variables of a behavior. Instead, all state can be method-local. Refer to the Unity documentation for the basics around coroutines.

For a recent project (A Unity “plugin” that runs old Sierra games – or at least those created with my SCI Companion), I needed to have an interpreter running that processes byte code – basically a game engine within a game engine. In its original (non-Unity) form, I ran the interpreter on a separate thread. This simplified things in some sense, as I could pause and continue this thread in order to pause or continue the interpreter (e.g. for stepping through byte code instructions one by one). In addition, the actual callstack of this thread could be used to store the actual callstack of the interpreter. The interpreter doesn’t only process byte-code – it can call through to “kernel” functions that I implement. And those in turn can call back into byte-code.

Supporting something like this on the same thread on which the “game engine within a game” is running would be extremely difficult, as control needs to return from the Update part of the game loop on each frame (for something like a standard Windows application, this wouldn’t be as difficult, as we can pump messages and process input at any point).

When I ported this project to Unity, I kept this architecture. However, WebGL was one of my target platforms – and javascript/html5 doesn’t support threads (currently). Indeed, building my project for WebGL verified this.

So I was left with the task of figuring out how to switch my architecture over to using coroutines – or figuring out if it was even possible! Remember, the callstack in my interpreter can be arbitrarily deep, and I really didn’t want to make every function coroutine aware.

The remainder of this post will summarize how I managed to accomplish this.

Requirements

I need the following things:

  • Some of my interpreter’s kernel functions need to yield (return control to Unity’s update loop, as they pause indefinitely).
  • Some of them need to yield conditionally (only return control sometimes).
  • My individual byte-code instructions need to conditionally yield also, since they may call into kernel functions.
  • If my in-game debugger is active, then of course I need to be able to potentially yield on each instruction processed.

Here’s the plan I came up with. First:

There is only a single coroutine – a top level “RunInterpreter” function that returns an IEnumerator.

It, in turn, calls into the rest of my interpreter code (specifically, it is a loop that processes byte code instructions). All other functions that either return control – or call into other functions that return control – need to return IEnumerable (not IEnumerator). Yes, this does mean that pretty much everything in my interpreter needs to be “coroutine aware”. That ended up not being a huge deal for the most part though. The trickiest bit was deciding how to return values from functions now that they must return IEnumerable.

For functions that clearly need to yield control (such as the Wait kernel, which waits for a specified number of real world milliseconds), or when the in-game debugger is broken into the interpreter, we simply need to do:

yield return null;

Now, I also had a situation where a virtual function was called. Some overrides needed to yield, and some didn’t. Because of the potential need to yield, the virtual function signature had to have a return type of IEnumerable. So what about those overrides that should not yield? A function that returns IEnumerable in C# won’t compile unless there is a yield somewhere in it. The solution is to use yield break:


// Pushes a value onto the stack
class push : Instruction
{
public override IEnumerable Do(byte opcode)
{
context.Push(context.Acc);
    yield break; // Don't yield at all!
}
public override byte Opcode { get { return 0x36; } }
}

This indicates that the enumeration has terminated – so basically the function will just return an empty enumerable. This is actually what happens at the end of a IEnumerable function which doesn’t end with a yield – there’s basically an implicit yield break there. From this, we can gather that in any cases where you had an early return from a function, yield break is also what you should use.

Now what about functions that call into other functions that might yield (i.e. other functions that return IEnumerable). For instance, in my project there is a callk byte-code instruction that calls a kernel function. A kernel function (such as Wait) might yield, so that needs to be propagated out. In that scenario, I iterate over the returned IEnumerable and yield each element:


foreach (var guy in interpreter.Kernel.Invoke(index, numParams, context))
{
yield return guy;
}

Note that in the case where the kernel function didn’t yield at all (which is the majority of the cases), an empty enumerable is returned. This means yield return guy is never hit, and we won’t yield control at this point.

This is important, as we definitely don’t want to accidentally yield control. Doing so would suddenly introduce a 16ms (or whatever your fixed timestep is) wait before we continued execution of the interpreter.

That’s pretty much it. Once you get the hang of how yield works, it ends up being pretty straightforward.


Leave a comment

Foreshift: Ludum Dare #35 post-mortem

Last weekend I completed the Ludum Dare 48 hour competition. The goal is to make a game from scratch in 48 hours: all the coding (apart from frameworks you make public beforehand), art and audio need to be done from scratch and by one person. It takes place around the world and well over one thousand people submit entries.

You can play my entry on the web if you have an html5 compatible browser.

The Ludum Dare competition entry page is here.

I’ve only completed this game jam once before (a few years ago), but have attempted it several times. I usually end up giving up partway through when I have no good ideas, my ideas aren’t panning out well enough, or it stops being fun.


Title

Title screen sequence


I thought that was going to happen again this time, because as of Saturday morning (the compo goes from 6pm Friday to 6pm Sunday in my timezone), I had rejected my initial idea and was back to square one.

The theme for this jam (announced Friday at 6pm) was Shapeshift. Instead of trying to get creative with the theme, I originally decided to just do the obvious: the player is an object that can morph into other shapes. In particular, you could morph between a circle, square and triangle, and move through the world in different ways depending on that. Movement was accomplished via torque (rolling). Not terribly original, and when I got a prototype up and running I didn’t find the mechanics very fun. In addition, the puzzles I was creating were very hard to fine tune.

At around noon on Saturday, I got a better idea: you would instead move around the levels like a normal character, and you would be able to swap the shapes of objects in the scene. A key difference here is that not all the shapes can move. A problem with my original concept is that the triangle and square pretty much had to move (in order to accomplish anything while playing them). This isn’t a natural thing for a square or triangle to do. With the new concept, movement is generally accomplished by turning an object into a circle. Squares and triangles are used for different tactics.

A constraint to make things more interesting (by limiting your options) is that you may only swap a shape with another shape that you are “holding”.

I was able to salvage some of the existing work I’d done on my first prototype and quickly get something up and running that seemed like it could be fun.

From here on out, I’ll discuss how I approached making the art, sounds and levels.

Art

Nearly all the art for my game was scanned hand drawings or heavily processed bits and pieces from photographs I had taken.

Thought bubbles

Sometimes little pieces of “final detail” can inspire you when uncertain game mechanics can not. When I was pondering how to show the UI for the “held shape” the player has, I thought of some of the UI in Little Big Planet – in particular the menu selections that popup on in-world billboards that are attached to the player by a rope.

So I decided that the held shape should be visible in a thought bubble that follows the player around in a nice organic way. My motivation had been lacking, but suddenly this seemed like a fun little challenge to try to implement, even if it wasn’t a core gameplay mechanic.


BalloonGif


The small mini though bubbles coming out of the player’s head could be attached on virtual hinges to the main thought bubble. I’d never used hinge joints in Unity before, but it was fairly straightforward to set up. The tricky part was setting the rigid body properties (mass, drag, etc…) to make the thought bubble in a reasonable fashion. Early on sometimes it would become disconnected and fly away, or continue bouncing uncontrollably.

A thought bubble with the held shape as the thought. The blue dots are the hinge joints.

A thought bubble with the held shape as the thought. The blue dots are the hinge joints.

The balloons and the held shape images are all just scanned hand drawings.

Platforms

I took some nice mossy photos the previous weekend, and so I thought I would chop pieces out of them in order to construct platforms.

All art needs to be created in the 48 hour time frame of the competition, but there is a grey area when it comes to “derivative” works of art. It’s probably ok if you create something (during the 48 hours) that is partially based on previously existing art, or heavily processed parts of that art – as long as you’re creating something new.

I extracted bits from the blob of moss on the left to create the platforms.

I extracted bits from the blob of moss on the left to create the platforms.

At this point I decided that I should incorporate some semblance of lighting into the game. I pull out long thin sections of moss and used the burn and dodge tools in Photoshop to create the effect of light on the platforms.

Instead of having just a single strip of moss (and variations of) to use in the game, I created variations for different platform orientations: horizontal, vertical and two diagonals. Since I was “baking” the lighting right into the platforms, they can’t be rotated arbitrarily in game – the lighting would look wrong. So making the variations was a simple thing that went a long way to make the lighting look somewhat polished:


Horizontals on the top, 2 verticals on the left, and 2 diagonals to the right of the verticals (rotated so they fit nicely in the spritesheet)

Horizontals on the top, 2 verticals on the left, and 2 diagonals to the right of the verticals (rotated so they fit nicely in the spritesheet)


The platforms in game:


Semi-consistent lighting in-game (from the top right) regardless of platform orientation.

Semi-consistent lighting in-game (from the top right) regardless of platform orientation.


The shapes

I had hand-drawn shapes for the UI versions of the three shapes, but I needed something to represent them in game. Bare wood seemed to fit with the forest theme, so I grabbed some parts of tree trunks from a photo and cut them into the appropriate shapes.


Circle, square and triangle shapes, along with "glowing" versions. The black dots are something I do so that I can have stable sprite names when I auto-slice the spritesheet in Unity before I've filled in all the parts of the spritesheet.

Circle, square and triangle shapes, along with “glowing” versions. (The black dots are something I do so that I can have stable sprite names when I auto-slice the spritesheet in Unity before I’ve filled in all the parts of the spritesheet).


I probably could have chosen a better source image, because they don’t exactly look like wood (but they are!). Later on, I decided I wanted a glow-y hover effect on the shapes, so I added versions of them with glow (typically easier and cheaper than doing glow programatically).

Now, since the shapes can rotate in-game, I needed some kind of dynamic lighting (hence the flatness of the source texture – no lighting baked in). I felt this was a pretty important aspect of the game, so I did my duty and implemented a 2d lighting shader that used normal maps:


Normal map for the shapes

Normal map for the shapes


And how they look in-game:


ShapesInGame


I’m not terribly satisfied with the final look (I should have used a more representative wood image), but the extra effort in implementing the custom shader was worth it.


The character

Character animation is hard (for me). I didn’t think I would be able to come up with a good-looking walk cycle, let alone even a static sprite/model that fit in with the forest scene. So I decided to think outside of the box a bit.

I took a drawing course a few years back, and I remember a lot of my drawings having kind of a scratchy, messy ethereal look. I decided it wouldn’t be hard to make some scratches that looked like a humanoid form. Better yet, I could leverage a walking cycle for a stick figure to help me draw the right forms.

Using that (and my iPad as a light table to help with tracing), I was able to draw this kind of stuff:


CharDrawing

I scanned it in, adjusted light levels and other assorted processing,  assembled the parts into a spritesheet and imported it into Unity and generated a 2d animation:


Hand-drawn walk cycle

Hand-drawn walk cycle


For the jump and idle states, I just did 2-frame animations to save time. If I’d had more time I would have make separate walking and running animations too.

Doors and switches

Does this look familiar?


Shelf fungus was used for the doors and switches.

Shelf fungus was used for the doors and switches.


If you’ve played the game, you may have noticed that the fungus in that picture looks a lot like the doors and switches:


Door


Again, these were processed in Photoshop to make the lighting consistent with their orientations in-game.

I wanted to have the door incorporated into some structure that make it feel more like a door, but I didn’t have time. I also struggled a bit with the physics here, and I bet I have some bugs because of this (the door can come down on top of the shapes and push them out of the way).


Door and switch

Door and switch


Shape spawners

The final game mechanic didn’t get implemented until mid-way through the second day. As I was designing levels I realized it was frustrating to keep having to reset the entire level when a shape ended up rolling off to somewhere where it could no longer be used. There’s generally no way to move a shape upward (something I would fix if I had time to implement more mechanics, maybe).

I can associate a shape with an optional spawner. Then when the shape “dies” (when it rolls off the screen), it will get respawned at its original position.

In general though, this behavior isn’t very well thought out. It doesn’t avoid the need to reset a level – a shape can still end up in a “dead end” without dying. And there are some subtle issues that arise when a shape has been “shifted” before it dies. What shape should it respawn as? I have to take the “held shape” into consideration. I attempt to keep the shape distribution even (as that’s a puzzle constraint), but it’s not always possible to do that. So there are some flaws here.

At any rate, this is about art. The shape spawner looks like a tree. It’s source image is a rock with moss on it (turned purpleish, for the bush part), and a real tree trunk for the trunk. Originally I was going to go for some kind of cannon, but I failed at drawing that. So instead I figured shapes could drop out of a tree.


The spawning bush.

The spawning bush.


The original patch of moss used for the above:


OriginalBush


Spikes

The bottom of the screen is lined with spikes that kill the player or the shapes. Where do they come from? A photo I took of a Devil’s Club plant, which has a very spiny stalk:


Devil

The texture I created from this that is used in game:


Spikes


Dust motes

What forest would be complete without bits of dust and pollen floating around? Ideally I’d have some sunshafts and dappled light flickering on things, but hey, this is 48 hours.

The dust motes were simply a little blob texture created in Photoshop. I have a script in Unity that creates a number of these and sends them off in random directions. They fade in, move around for a bit, then fade out. Maybe 20 minutes or so of work to make, and they help a lot with the atmosphere:


Motes

The title sequence

A good title screen is important to set expectations of quality and polish. I stopped designing levels with 2 hours left in the competition, and devoted that remaining 2 hours to the title and ending screens.

For the title, I did what I had been doing all along – which was draw some stuff on paper and scan it in. Scratchy letters to go along with the theme (I actually used no fonts in the game at all!).


TitleRaw


When I did this, I realized that the “I” in Foreshift (a portmanteau of forest and shift) looked a lot like the character idle animation. So I left it out of the texture and just plopped the character there in game. Now my title would be dynamic! He (or she) is standing on an invisible platform which disappears when you press any key. That causes the character to drop down (transitioning to a jump animation state) and land on a platform, whereupon I direct him/her to the right. As you saw at the beginning of this post:


Title


 Audio

I like composing music (though I’m not very good at it), but I find it extremely time-consuming. As a result, I used no music in the game at all. I was going to try to record a few chord progressions on my keyboard for “winning a level”, but I ended up not having time at the end.

However, I did put a lot of effort into sound effects. I’ll describe what I ended up using for various effects.

The ambient background noise

The airy ambient noise is just a recording from my apartment balcony. Unfortunately the birds had stopped chirping by the time I got around to recording it, so I add to add bird sounds manually.

I used sfxr to generate bird sounds. Mostly just by clicking “random” until it generated a sound that roughly approximated a chirp. I then added these to the background ambient noise in my audio editor.


Character sounds

The walking sound is me stomping on a shag carpet:


The sound the player makes when jumping used to be more of a grunt. When I finalized the look of the character, I decided I needed something more ethereal and softer. So I recorded a bunch of “huh” sounds. I recorded four variations of this:

Shape sounds

When a shape impacts something with enough velocity (either a platform or another shape), it makes a thud. This is me slapping my hand on a leather sofa.


The pop sound when you switch shapes is just me doing a mouth pop.


The circle shape makes a sound when it rolls. I’ve used a salad spinner to make rolling sounds before, but that makes more sense for a hard surface. I tried to imagine what rolling a bowling ball on the forest floor would sound like. I thought maybe leaf crinkles? I had no leaves on hand, and no time to go outside to record something, so I ended up just crumpling up a plastic bag.


Other sounds

The door opening and closing is just a drawer opening and closing. Likewise, the “win the level” sound is just a me opening a door:


The death sound (I think, I forget) is a combination of plastic bag crunching and slapping the leather couch:


What went right

I’m a lot more familiar with Unity now that I’ve been using it consistently for several months. This made it easy to get stuff up and running quickly.

I got a good amount of sleep (7 hours the first night, 4 hours the second night), so I never felt like I was running on empty. I’m not sure I could do a 3-day jam though.

I think I paced myself pretty well. I made it a goal of finishing the level design two hours before the end of the compo just to ensure I’d have enough time to put some finishing touches in. I did roughly that, and in the final hour and a half I made the finishing touches I needed:

  • Title screen – first impressions are important, so I wanted to do this well.
  • Some kind of ending when you finish the last level (just a credits screen and a button that sends you back to the start – but it’s better than nothing).
  • A refresh button that resets the level incase you get into an impossible-to-solve situation

I also made it a goal of prioritizing some of the polish before the level design, and I think that was a good idea. Most people who play/judge probably won’t get through all 7 levels. So from that perspective, it’s more important to make the beginning a smooth experience. Some examples of that are:

  • Making sure the introductory levels are clear and simple
  • Making the death and respawn a good experience. Too many jam games just have the player vanish without flair and the level gets instantly reset. This makes the game feel cheap and unprofessional. Once I realized that the player dying was going to be a thing, I put work into it: sound effects, and a dying animation. I did a similar thing for the shapes “dying” too, but not quite as well.
  • I even made a skull and crossbones appear in the player’s thought balloon when they die, and the thought balloon drifts off into space.


Death sequence

Death sequence


For the art, I think I did a good job choosing goals that were within my scope: Which was either pieces of photographs that were manipulated to give lighting, or “intentionally rough” hand drawn scanned sketches.

I’m not 100% pleased with the consistency of the art (for instance, there is a bit of a confusing dichotomy between the scratchy line art and the other stuff), but it’s not bad. I definitely took some time to make sure all the visuals fit nicely together. The forested background is probably one piece of art I’m not very pleased with (The exit door and the switch/door combo also look a bit unfinished).

During the 48 hours, I saw a lot of people (on twitter) putting up links to preliminary builds, short videos and other things. While it’s nice to keep the community updated on what you’re doing (to help inspire and posh others, say), I didn’t think that would be a good use of my time. I put up maybe one screenshot, but that’s about it. I didn’t prepare any builds for playtesting, or make any videos.

What could have gone better

Random technical issues

I did have some technical problems. I left audio until mid-way through the second day of competition, only to discover that my editing software (Sony Vegas) had suddenly started crashing on startup. I spent half an hour fixing this (finally tracking it down to a codec installed on my machine, and renaming the .dll to something else so Vegas couldn’t find it).

Test out all your tools beforehand!

WebGL

I still don’t trust Unity’s WebGL build completely. What it does is super impressive, and it ended up working out fine in the end. Before the compo started, I tested out the workflow of making an html5 build and uploading it to my webserver (icefallgames.com), and that worked without issue (I was surprised!).

Chrome was flakey in running the html5 builds locally (it worked 50% of the time, maybe 75% of the time when refreshing the webpage). So I often had to upload it to my server to know if there was really an issue with the build or not.

Right at the end, I made an html5 build with a different default resolution (so that  could embed it in the competition entry page), and suddenly my main character’s texture was all messed up! I struggled with this for a while, but clearing out all the build directories and restarting Unity seemed to fix the problem. Not really sure what was going on.

Physics gameplay

When designing levels, fine-tuning the physics was more difficult than I had anticipated. I haven’t done many physics-based games. Tweak one parameter to fix a certain situation, and you break other places. This made the final push for level design take longer than I would have liked.

The jumping is also a bit buggy currently. The player sometimes catches on platform edges (you can always get out of it, but it doesn’t look good). This is one of the first platform games I’ve made, and jumping and movement is notoriously hard to get right for platformers.

Unforeseen gameplay flaws

After completing 6 of my levels, I realized there was a fundamental flaw in the gameplay. I describe this a bit in the art section about the shape spawners. In the end, it doesn’t really matter because you can always just reset the level. But it is possible that it might make the level easier to complete, depending what happens.

It was also evident with playtesting that it was very easy to get the level into an unsolvable situation. Again, the reset button (or player suicide) just resets the level, so at least I have that as an escape valve. But if this were a “real” game, I would need to address this. I’m not sure this should be listed in “what went wrong”, because I’m not sure it’s avoidable when designing a game in such a short time.

Polish

There were a few bits of polish on my list. I wanted a better “winning the level” experience (some flourish and/or music). And I wanted to juice things up with some screen shake or other effects. I really wanted to, but decided it was too risky with only 15 minutes left (which is when I got to that work item).

It also would have been nice to have time to make the levels a little more visually distinct.

Summary

Ok, I guess that’s about it! Please try my game and let me know what you think!


6 Comments

Decompiling SCI – part 4 – final steps

Here’s a link to part 1 of this series.

Generating the abstract syntax tree

Generating the AST from the instruction node tree ends up being fairly straightforward.

SCI Companion has the following syntax nodes (that appear in the AST): value (these can be tokens, strings, saids, selectors or numbers), complex value (like value, but allows for an indexer if it’s a token), assignment, variable declaration, define, class property, function, class definition, synonym, code block, send param, L-value, send call, procedure call, condition expression (old syntax only), case, switch, asm statement, asm block, return, binary operation, unary operation, n-ary operation, for loop, while loop, do loop, break statement, continue statement, rest statement, script, comment, function parameter, function signature, if, export, cond statement.

For most of the control structures in the tree, there ends up being a straight mapping to a particular type of syntax node.

For sequences of raw instructions (that don’t affect control flow), it becomes just slightly more involved:

ldi, pushi, push0, push1, push2

These end up simply being numeric values:

	ldi 3 
	aTop cycles

	(= cycles 3)

callk, callb, calle, call

These become procedure calls:

	push2
	push0
	pushi 3
	callk Random 4

	(Random 0 3)

send, self, super

These are a little more involved, since they may have multiple send params for a single send target. Each one has a parameter count associated with it, and we need to assume that we can get a numeric value for the instruction that designates the parameter count.

	pushi 28 // $28 number
	push1 
	pushi 96 // 150
	pushi 3 // $3 loop
	push1 
	pushi ff // -1
	pushi 27 // $27 play
	push1 
	pushSelf 
	lag gGlobalSound 
	send 12 

	(gGlobalSound number: 150 loop: -1 play: self)

lsub, mul, div, mod, shr, shl, xor, and, or, add, eq, gt, lt, le, ne, ge, ugt, uge, ult, ule

These become binary operations:

	pTos state 
	ldi 2 
	add 

	(+ state 2)

bnot, not, neg

These become unary operations:

	lal local1 
	not 

	(not local1)

rest

Simply a rest statement:

	pushi 6e // $6e init
	push0 
	&rest 1 
	super KQ6Room 4 

	(super init: &rest)

lea

Becomes a value that is marked as being a pointer (and possibly has an indexer):

	lea local13

	@local13

class, pushself

Become values that are marked as tokens:

	pushi 51 // $51 delete
	push1 
	pushSelf 
	lag gKq6WalkHandler 
	send 6 

	(gKq6WalkHandler delete: self)

lofsa, lofss

Become values that are marked as literal strings, saids, or tokens depending on the numeric value they reference (we need to reference the script resource to find out):

	push2 
	lofss $0644 // *** ... well, Okay.
	lofss $0542 // lampStartScript
	calle 399 procedure_0000 3 // proc921_0 

	(proc921_0 {*** ... well, Okay} lampStartScript)

atop, stop

These become assignment operations. We need to reference the script resource here to look up the property name, since these instructions use a property index which pertains to the “current” object.

	lap param1 
	aTop state 

	(= state param1)

ptos, ptoa

Instructions to read from class properties. Similar to above in that we need to look up the property name, but these are simply values marked as tokens.

	pTos state 
	ldi 5 
	gt? 

	(> state 5)

iptoa, dptoa, iptos, dptos

Similar to the above, but this ends up being a unary operation (– or ++):

	dpToa state 

	(-- state)

ret

Becomes a return statement.

selfID

Becomes a property value for a “self” token (selfID puts a pointer to self in the accumulator, while pushSelf puts it on the stack):

	selfID
	sal local8

	(= local8 self)

push, pprev

These just forward onto their only child (which will have an instruction that sets the accumulator, or the prev register in the case of pprev). push just pushes the accumulator value onto the stack. Since the abstract syntax tree doesn’t care about stack vs accumulator (it’s an implementation detail of the byte code, so to speak), we basically ignore it. We already took it into account when generating the instruction consumption tree.
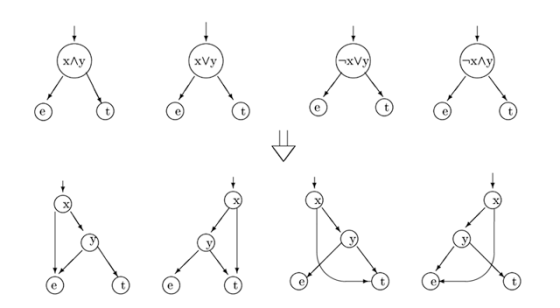
bt, bnt

These are essentially ignored at this stage (they were taken into consideration in the control flow graph), and just forward on to their only child.

dup, jmp, link

These can also be ignored at this stage.
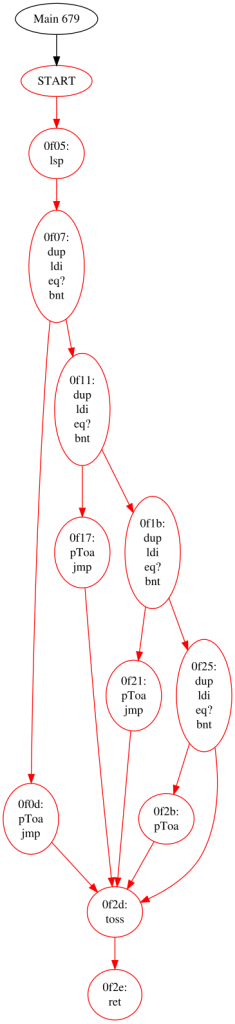
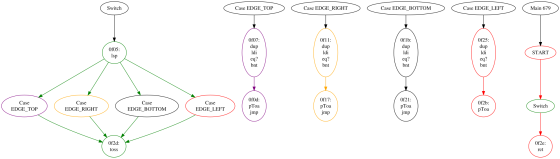
toss

This indicates the end of a switch statement. These should have already been pruned (and their surrounding code should already be in the form of a switch stratement in the control flow graph), but there are cases where we have mid-identified degenerate switch statements. So if we encounter this, we generate a switch statement with a single (default) case.

Others…

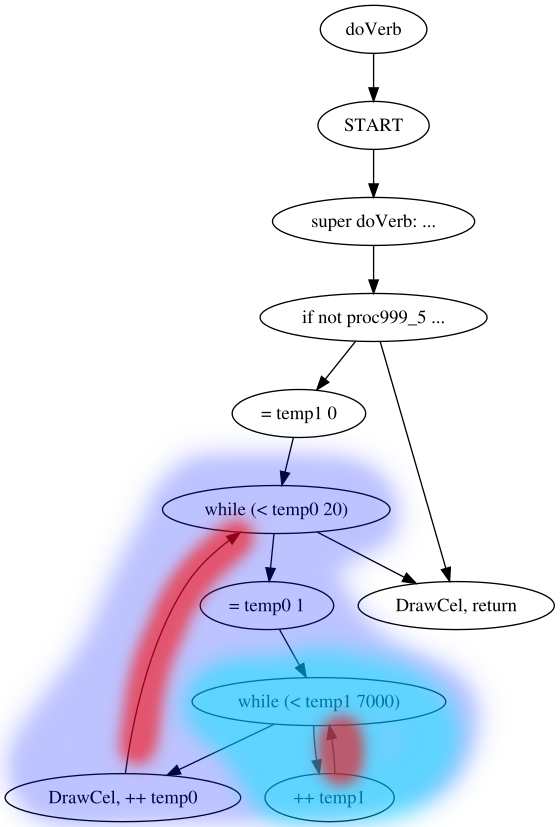
The rest of the instructions involve load and store operations for global, local, temporary and parameter variables. So it is a matter of creating assignment operations (for the store opcodes) or values (for the load opcodes), and looking up the appropriate variable name.

	ldi 0 
	sat temp0 
	lst temp0 
	ldi 6 
	lt? 
	bnt code_0101 

	(= temp0 0)
	(while (< temp0 6)
		...
	)

Naming and symbol resolution

We’ve glossed over this so far, but coming up with the correct meaningful names for variables and tokens is important (not just for decompiling, but also disassembling).

There are a few different categories here:

  • names we can find out for certain (class names, instance names, property names)
  • names for which we have no information at all (local variable names)
  • values in the code that refer to objects, strings or selectors. All values are just 16-bit numbers, but some of them are pointers, and we need to try to replace them with the correct textual value.

Let’s go over each of them in more detail.

Known symbol lookups

The script resources themselves contain the names for classes and instances defined in that script – that’s pretty straightforward. We also need to reference superclasses though. They are generally referred to by their class number (just a 16-bit value).

SCI games have a class table resource that lists that basically maps a number to an index within a particular script resource. For instance, class #33 might be the 2nd class defined in script 988. For this reason, to build a mapping of class number to class name, we need to actually load all script resources in the game (or at least all those listed in the class table resource) and search for the class name. This table that we construct is actually fundamental not just for decompiling, but also compiling.

For property and method names, it is a little easier. Both properties and methods are identified by their selector number. SCI games have a selector table resource that is a direct mapping of selector number to selector names.

Heuristics for generating meaningful variable names

Unfortunately, there is no trace left of the original variable names in the compiled byte code. That means we don’t know the names for global variables, script variables, temporary function variables or parameters.

We do know which type of variable something is though, and we know its index. When the abstract syntax tree is generated during decompilation, automatic variable names are generated that simply combine the variable type and index: global25, or temp1, say.

We then perform a renaming pass that attempts to give more meaningful names. The following things happen:

  • We leverage an editable decompile.ini file which lists known parameter names for certain methods. For instance, it will name the first parameter to the commonly-overridden changeState method “newState”. Likewise, handleEvent’s first parameter is “pEvent”.
  • The first bunch of global variables tend to be the same across games, so we have a pre-defined list of what these should be named.
  • The first assignment to a variable in a function will attempt to generate a name based of what was assigned to it. For instance, if we see “(= temp0 x)“, we’ll rename temp0 to “theX“. It’s not perfect, but at least it helps give some indication as to what the variable might be used for.
  • When we assign to global variables, we store that information so that it may be re-used by subsequent scripts. For instance, if we encounter the code “(= global75  features)“, we’ll rename global75 to “gFeatures“. This will be picked up by further decompiles of scripts that reference global75.
  • The user can also guide the renaming of global variables and public procedures by giving them new names during the decompilation process.

Naming constants

Of course, it’s not only variables that need good names. We also want constants to be properly defined.

For instance, the Palette kernel call takes a subfunction as its first parameter. This is just a number, but there are eight different functions it might represent. sci.sh, the global header file, as these defined. Using the decompiler.ini file, we can indicate that the first parameter to Palette is one of these defines. That allows the decompiler to turn this:

    (Palette 1 97)

into this:

    (Palette palSET_FROM_RESOURCE 97)

We can also do this for variables of certain names. For instance, we can say the type property of a variable called pEvent should be one of the event type enumeration values defined in sci.sh. This lets us produce code like this, where it’s clear we’re handling mouse events:

	(method (handleEvent pEvent)
		(if (== (pEvent type?) evMOUSEBUTTON)
			(if
				(and
					(User controls?)
					(not script)
					(== (pEvent type?) evMOUSEBUTTON)
				)
				(gEgo setMotion: theSMover (pEvent x?) (gEgo y?))
				(pEvent claimed: 1)
			)
		else
			(super handleEvent: pEvent)
		)
	)

Another scenario in which the decompiler.ini config file is useful is to identify parameters which might be selector literals. Some of the fundamental methods on the SCI object base class take selector literals as parameters (for example, the firstTrue method). From the decompiler’s standpoint, the value passed to this method is just a number. But we can tag it as being a selector so that we can generate more meaningful code at the call site. An example from Space Quest 1 VGA, where we know that the first value passed to the firstTrue method is a selector:

    (= temp0 (gCast firstTrue: #isKindOf Elevator))

This is assigning the first cast member that is a subclass of Elevator to the temp0 variable.

Defining these values/types for just a handful of common scenarios goes a long way to generating readable code right off the bat.

Another important scenario where we need to make some guesses is in the instance property lists. When an object instance is defined, you can override the default property values for its species. This property value is a 16-bit number as always – but it might be an offset into the script’s string table or said table. How can we know this? We can’t know for sure (we could get some false positives), but every property value is checked to see if its value matches one of those offsets. As a result, inventory items decompile correctly:

(instance Grenade of RInvItem
	(properties
		view 564
		cursor 16
		signal $0002
		description "You have a small innocuous looking grenade."
		owner 58
	)
)


Array bounds

As mentioned before, variables are referenced in byte code by their type and index. The notion of arrays doesn’t really exist. A function or a script just declares that it has, say, 10 variable slots. These could be 10 single variables, or perhaps 5 single variables and a 5 element array.

However, by examining how these variables are used we can get an idea of which parts of the variable block are explicitly referenced, and which parts are only referenced by index. As an example, in script 40 of Space Quest 1 VGA, we encounter this code:

		(holePoly points: @local1 size: 8)
		(shipPoly points: @local17 size: 8)

By examining this and other local variable usage, we come up with the following list of local variables, two of which we define as arrays (they appear to be lists of polygon coordinates).

(local
	local0
	[local1 16] = [178 169 196 162 222 160 256 164 265 168 253 177 220 182 189 178]
	[local17 16] = [178 171 177 155 222 150 264 157 269 170 242 170 232 177 201 170]
	gEgoEdgeHit
	local34
)

Parameters

Unlike temp, local and global variables, there is no explicit count of function parameters anywhere in the byte code. This makes sense, because SCI allows for a variable number of parameters for all functions. As a result, we need to scan the function for code that references parameters (like other variable types, they are referenced by index), and any usages of a rest instruction (which forwards unspecified parameters onto another function). From this information we can figure out the number of named parameters.

Function return values

In SCI, functions return values via the accumulator. The byte code offers no hint as to whether a function intentionally returns a value or not.

We make some attempt at guessing. If we encounter an opcode with no side effects (i.e. all it does is put something in the accumulator – no functions called or properties set) that is right before a ret instruction, then we’ll assume the function intentionally returns a value. This will affect how we generate the instruction consumption tree: ret instructions will consume the accumulator.

Our guess isn’t correct all of the time, but it ends up not really mattering from an accuracy point of view. The re-compiled code should still exhibit the same behavior (in terms of what’s “accidentally” left in the accumulator at function exit) as the original byte code.

Number formatting

Numeric literals in source code may be specified in decimal or hexadecimal (or binary, or by ASCII character). And they may be signed or unsigned.

In the AST, numeric literals are represented by a value node. The numeric value is always stored as an unsigned 16-bit value, but it can be tagged as being “negative”, or in “hex”. This doesn’t change the underlying value, it’s simply a clue as to how to present it when formatting it for output.

Of course, we usually have no explicit information in the byte code that helps us decide which way to output the number. As result, we need to apply some simple heuristics:

Any value that is a direct child of a bit-wise operation (whether it be a binary, unary or assignment operation) will be tagged as “hex”.

	(method (enable param1)
		(if param1
			(= state (| state $0001))
		else
			(= state (& state $fffe))
		)
	)

Currently, any value that is larger than 32767 (the largest signed 16-bit value) will be tagged as negative. Obviously this isn’t always the right choice, but it tends to be.

	setMotion: MoveTo -108 224

Tracking script dependencies

Compiling an SCI script requires that any scripts than contain referenced classes or procedures from other scripts have those other scripts’ filenames listed in the use statements at the top of the script being compiled.

Thus, to generate a perfectly-compilable script, we need to scan all code and classes for references to public procedures and class names. Then we need to figure out the names of those scripts where they reside and add in the appropriate use statement in the AST.

Failure

The decompiler isn’t perfect, but typically it can decompile about 95 to 99 percent of a game into source code. Success is typically on a function-by-function basis. Luckily, if an error or unexpected condition occurs anywhere during the decompilation of a function, we can have the entire function fallback to assembly. This at least retains the ability to recompile code correctly, and also retains some symbol information. An example from Space Quest 1 VGA, Talker::startAudio:

	(method (startAudio param1 &tmp temp0)
		(asm
			lap      param1
			sat      temp0
			pushi    2
			pushi    1
			push    
			callk    DoAudio,  4
			pToa     mouth
			bnt      code_0452
			pushi    #setCycle
			pushi    2
			class    40
			push    
			lst      temp0
			pToa     mouth
			send     8
code_0452:
			pushi    2
			pushi    2
			lst      temp0
			callk    DoAudio,  4
			aTop     ticks
			pToa     eyes
			bnt      code_046d
			pushi    #setCycle
			pushi    2
			class    RTRandCycle
			push    
			pTos     ticks
			pToa     eyes
			send     8
code_046d:
			ret     
		)
	)


Note that I actually had to add an additional opcode that isn’t present in SCI. the lea opcode loads the address of a variable into the accumulator. It can also have a flag that indicates “use the previous value in the accumulator as an array index”. I could have changed symbol resolution for the operands to support referencing the accumulator, but the most straightforward choice was just to add an additional opcode called “leai“, which is handled specially during disassembly and compiling.

With a bunch more work, it should be possible to have the decompiler 100% effective (except for corrupted scripts, of course) – but I decided that the effort vs reward wasn’t worth it beyond this point, especially given the fallback to assembly. It’s good enough to be able to create a template game from and for people to easily write script patches or mods to existing games.

Code output

SCI Companion supports both the source code syntax of SCI Studio, and also a newer syntax that is much closer to that used by Sierra originally.

There are modules that output source code in either of these formats based on the given abstract syntax tree. However, there isn’t necessarily a one-to-one mapping of syntax nodes to source code. The abstract syntax tree code was mostly written when only the SCI Studio syntax existed. Some of the forms don’t map quite as nicely (or can be expressed more efficiently) in the Sierra syntax. Since the Sierra syntax is the preferred syntax, we’ll go through some of the additional transformations we do on the syntax tree as we’re formatting it as source code.

Do-loops don’t exist in the Sierra syntax, so they need to be converted into repeat statements that end with a breakif statement in place of the do-loop condition. An example:

		(repeat
			((= param1 (Event new: -32768)) localize:)
			(if (!= (= temp0 (self check: param1)) temp1)
				(HiliteControl self)
				(= temp1 temp0)
			)
			(param1 dispose:)
			(breakif (not (localproc_0022)))
		)

While-loops that are determined to be infinite are just converted to repeat statements.

Sierra syntax has a shorthand for nested if-then-else clauses: the LISP-like cond statement. When outputting an if-statement, if nested if-statements are detected, we use the cond syntax instead:

	(cond 
		((& (gEgo onControl:) ctlYELLOW) (Print {You can't do that from here.}))
		((& (gEgo onControl:) ctlFUCHSIA) (gEgo setScript: egoTouchesAcid))
		((== global166 1) (Print {You can't do that from here.}))
	)

Sierra syntax supports n-ary operations for several operators, whereas the SCI Syntax only supports binary operations. If nested binary operations are found, we try to coalesce them into an n-ary operation (e.g. (+ a b c)).

The if-then-break and if-then-continue forms are turned into the Sierra-specific breakif and contif statements.

Another thing to note is that there are some forms the decompiler will never generate:

  • No for-loops are ever generated, as they are simply while loops with some initialization code prior to the loop start. With some extra effort I could have tried to guess what code should be put into a for-loop‘s initialization and afterthought parts, but I did not deem the value worth the effort.
  • Operator assignments like += or -= will never be generated (they will just retain the regular form (= a (+ a 1))). Another “nice to have” but not essential feature.
  • The Sierra syntax supports a switchto statement with implied case values (starting from 0). The decompiler will always just output switch statements, however (which have explicit case values).
  • The Sierra syntax supports (rarely-used) multilevel break and continue statements, but these will never be output. In fact, the control flow analysis does not handle these properly, and so decompilation will likely fail if this pattern is encountered. This will cause us to fall back to assembly.

Summary

Hopefully this has been an educational walk-through of the details involved in going from byte code to source code.

There are of course more subtleties and complexities that I have glossed over in these blog posts, but the SCI Companion source code is available for perusal.

2 Comments

Decompiling SCI – part 3 – instruction consumption

Here’s a link to part 1 of this series.

Another fundamental concept we need to introduce is instruction consumption.

The basics

Each SCI instruction (opcode + operands) “consumes” a certain number of values from the stack, or the value of the accumulator or prev registers. Likewise, it may “generate” a result that gets pushed onto the stack, or placed in the accumulator or prev register.

Let’s look at a simple example. Consider the following code:

(= localVar (+ param1 3))

and its corresponding assembly instructions:

lsp param1 
ldi 3 
add 
sal localVar 


How do we go about actually constructing the former from that latter?

We can start from the last instruction (sal localVar), which means “store the value of the accumulator in this local variable”. From this, we know we we’ll have an assignment operation, and the value that is being assigned will come from the value in the accumulator.

So going backwards, we see the previous instruction is add. This satisfies our need for an accumulator value, since add places its result in the accumulator. So the result of the add is what will end up being assigned to the local variable above.

Of course, add consumes an accumulator value itself, in addition to popping a value from the stack. So we work backwards again trying to find an instruction that pushes a value onto the stack, and the next instruction that places a value into the accumulator. Luckily, in this case, these are immediately satisfied. ldi places a value in the accumulator (3), and lsp pushes a value onto the stack (the value of param1).

Essentially, we’re building a tree of instructions, where a node represents an instruction and a node’s children represent instructions that generate the data needed for the node’s “consumption”. So in the above example, we’d have:

  • sal local0
    • add
      • ldi 3
      • lsp param1


In practice of course, these trees become quite large and nested quite deeply. SCI has some fairly complex instructions that can consume arbitrary amounts of stack values.

The problems

Things aren’t always so clean as in the previous example.

For instance, it is not uncommon for a value in the accumulator to be “consumed” by multiple instructions.

Consider the following assembly from the spotEgo method in script 80 of King’s Quest 6:

	pToa spotEgoScr 
	bnt code_01f6 // Consumes the accumulator, which is spotEgoScr.
	pushi 92 // $92 setScript
	pushi 3
	push // Consumes the accumulator, which is spotEgoScr.
	push0 
	lsp param1 
	lag global2 
	send a 

The value in the accumulator is used twice. This decompiles into the following code, which is a pretty common pattern (branch on something, then use the value that was branched on):

		(if spotEgoScr
			(global2 setScript: spotEgoScr 0 param1)
		)

Speaking of branching, what happens if we encounter a branch or jump instruction while backtracking? Suddenly, we can’t form a good idea of what constitutes the statement we’re trying to build, since the shape of our instruction consumption tree would depend on which branch was taken.

Tying it together with the control flow graph.

Both the control flow graph and the instruction consumption logic work together in determining the final decompiled source code.

The control flow analysis should have removed any stray branch instructions (jmp, bt or bnt) in the sense that they would have turned into semantic control flow graph nodes (if statements, loops, etc…), leaving just non-branching sequences of instructions. So our instruction consumption code doesn’t really need to deal with them anymore.

However, it does need to deal with the problem of not being able to satisfy instruction consumption in the current sequence of instructions. So let’s see how that might work.

Let’s revisit what we have in our control flow graph. Yes, we have all those semantic nodes: if, loop, switch and so on. But we also have “raw code” nodes in the leaves of the graph. That is, the condition node in a loop will contain the raw set of instructions that comprise that condition.

So if we take our example from the previous section, after doing our first pass of instruction consumption, we’ll end up with something like this:

  [If]
    [Condition]
      bnt  [01e5]
        pToa  [01e3]
    [Then]
      send  [01f2]
        pushi  [01e7]
        pushi  [01ea]
        push  [01ec]
          [NeedsAccumulator]
        push0  [01ed]
        lsp  [01ee]
        lag  [01f0]

You’ll see that we were not able to find an accumulator value to satisfy the push instruction. So we tagged it as “needs accumulator”.

On a second pass, we’ll try to work backwards to find the appropriate value. Below, you’ll see that we “cloned” the pToa value from above:

  [If]
    [Condition]
      bnt  [01e5]
        pToa  [01e3]
    [Then]
      send  [01f2]
        pushi  [01e7]
        pushi  [01ea]
        push  [01ec]
          pToa  [01e3]
        push0  [01ed]
        lsp  [01ee]
        lag  [01f0]


Working backwards doesn’t just mean returning to the original set of raw instructions and scanning backwards, of course. Then we run into the problem again of branching interfering with a static known path to our current instruction.

Instead, we need to follow the control flow graph hierarchy “up and backwards”. And the way we do that ends up being fairly complex, and changes depending on the type of the node in the control flow graph.

Another point that is important to bring up: Some of the control flow graph nodes themselves need to be treated as though they generate a value for the accumulator. For instance, if-statements, switch-statements and isolated compound conditions are all treated as such. That is, if we can’t find an accumulator-value-producing instruction to satisfy our instruction consumption, and we encounter an if node while navigating “up and backwards”, then we’ll use that if node as an accumulator-value-producer. This is a pattern we see often in source code like this (this would be the equivalent of the ternary operator in most languages):


(= someVar
    (if blahblah 5 else 2)
)


Of course, then we need to make a call as to whether we can remove the if node from its previous spot in the instruction consumption tree, or we have to leave it in and clone a new one (resulting in possibly incorrect code since we’ll evaluate the if-statement twice). These subtleties and complexities help to illustrate some of the difficulties in implementing an accurate decompiler.

During this phase we also do some analysis to classify loops: are they while-loops, do-loops or infinite loops? We can analyze the structure of the loop to figure this out. For instance, if the latch node has two successors, and the loop head node has only one, we know it’s a do-loop (the loop condition comes at the end).

Summary

At the end of the instruction consumption phase, we have now generated a “consumption node” tree that incorporates both information from the control flow graph, but also more detailed information on how individual code statements are constructed: flat sequences of instructions have been re-organized into hierarchical forms. We’re now ready for the next phase, which involves constructing the abstract syntax tree for the source code.

Below is an example of what the instruction consumption tree might look like. First, the decompiled method:

	(method (constantRocks &tmp temp0)
		(rCliffs cheatCount: 0)
		(= temp0 0)
		(while (< temp0 7)
			((= [newRockStep temp0] (RockStep new:))
				x: (if argc (- 320 [local246 temp0]) else [local246 temp0])
				y: [local262 temp0]
				cel: 3
				rockPointer: temp0
				corner: (if (== temp0 6) 1 else 0)
				init:
				stopUpd:
			)
			(if (< temp0 6) ([newRockStep temp0] addToPic:))
			(++ temp0)
		)
	)


And then, the instruction consumption tree that was used to generate this:

  link  [0350]
  send  [0359]
    pushi  [0352]
    push1  [0355]
    push0  [0356]
    class  [0357]
  sat  [035d]
    ldi  [035b]
  [While]
    [LoopBody]
      send  [03b0]
        push1  [0366]
        push1  [0367]
        push  [037a]
          [If]
            [Condition]
              bnt  [036a]
                lap  [0368]
            [Else]
              lali  [0378]
                lat  [0376]
            [Then]
              sub  [0373]
                pushi  [036c]
                lali  [0371]
                  lat  [036f]
              jmp  [0374]
        push0  [037b]
        push1  [037c]
        lsli  [037f]
          lat  [037d]
        pushi  [0382]
        push1  [0384]
        pushi  [0385]
        pushi  [0387]
        push1  [038a]
        push  [038b]
          lat  [037d]
        pushi  [038c]
        push1  [038f]
        push  [039c]
          [If]
            [Condition]
              bnt  [0394]
                eq?  [0393]
                  push  [0390]
                    lat  [037d]
                  ldi  [0391]
            [Else]
              ldi  [039a]
            [Then]
              ldi  [0396]
              jmp  [0398]
        pushi  [039d]
        push0  [039f]
        pushi  [03a0]
        push0  [03a3]
        sali  [03ae]
          push  [03ab]
            send  [03a9]
              pushi  [03a4]
              push0  [03a6]
              class  [03a7]
          lat  [03ac]
      [If]
        [Condition]
          bnt  [03b7]
            lt?  [03b6]
              lst  [03b2]
              ldi  [03b4]
        [Then]
          send  [03c1]
            pushi  [03b9]
            push0  [03bc]
            lali  [03bf]
              lat  [03bd]
      +at  [03c3]
      jmp  [03c5]
    [Condition]
      bnt  [0364]
        lt?  [0363]
          lst  [035f]
          ldi  [0361]
  ret  [03c7]


The next post ties everything together and summarizes the final steps.

3 Comments

Decompiling SCI – part 2 – control flow

Here’s a link to part 1 of this series.

Now we have a directed graph that consists of nodes of branch-less instruction sequences in a function (since the branches became the edges of the graph). This is what is needed to perform control flow analysis.

Resources

Here are some resources (generally white papers, course notes or wikipedia pages) that were useful for implementing control flow analysis.


Overview

Given the “raw” graph of instruction sequences, we proceed to reduce this graph by iteratively incorporating more semantic meaning to parts of it.

For instance, if we recognize a group of nodes in the graph as a loop, we can replace those nodes with a single loop node that contains information indicating which child nodes represent the head, latch and looping condition of the loop.

The basic control structures we look for are: loops, switch statements, compound conditions and if statements.

When detecting a particular type of control structure, we generally proceed from innermost structures to outermost. There are some possible failure points here, for instance when two control structures overlap and one is not completely contained within another. In that case we have no way to reduce the control flow graph, and we fail the decompilation. However, as far as I know this never occurs in actual game code.

Loops

The first control flow structures we look for are loops. To do so, we must calculate the dominators for of each node of the graph. Node A dominates another node B when all paths to node B must first pass through node A. Node A is an immediate dominator of another node B when node A dominates node B, but does not dominate any other node that dominates node B. These concepts make formal reasoning over the control flow graph more straightforward.

We use an algorithm by Tarjan and Lengauer to calculate the dominators (a link to a paper on this is listed in the Resources above).

With the dominator information, we can identify back edges in the graph (these are the edges where the tail of the loop jumps back to the beginning of the loop). This happens when a node (which ends up being the head of the loop) dominates its predecessor (which will end up being the tail of the loop).

Consider the following method (participle::doVerb from King’s Quest 6):

	(method (doVerb theVerb &tmp temp0 temp1)
		(super doVerb: theVerb &rest)
		(if (not (proc999_5 theVerb 1 94 28 13 12))
			(= temp0 0)
			(while (< temp0 20)
				(= temp1 0)
				(while (< temp1 7000)
					(++ temp1)
				)
				(DrawCel
					970
					5
					(Random 0 (- (NumCels self) 1))
					nsLeft
					nsTop
					15
				)
				(++ temp0)
			)
		)
		(DrawCel 970 5 0 nsLeft nsTop 15)
	)

Here’s the control flow graph we generate for it (I’ve replaced the assembly instructions with the final decompiled constructs for clarity):


Back edges are highlighted in red. When you have a node A that has a predecessor B, and all paths to that predecessor B must go through node A, then this is a loop back edge. The back edge goes from the loop latch to the loop header.

Back edges are highlighted in red, and the resulting loops are highlighted in blue and cyan (one contained within the other). When you have a node A that has a predecessor B, and all paths to that predecessor B must go through node A, then this is a loop back edge. The back edge goes from the loop latch to the loop header. We can then follow predecessor paths from the latch back to the head in order to determine which nodes are children of the loop structure.


Once we’ve identified a back edge, we then need to find all the child nodes of the loop (the head, latch, and the other nodes that comprise the body of the loop). We can follow the tail node back to the head node to collect all these children.

There is one additional issue here though. Loops can contain break statements. In our situation, these will be nodes whose successors are outside the loop. So following the tail node back to the head node will not pick up these nodes. Instead, we determine the follow node of the loop. This is the node just outside the loop which follows the loop. It’s where breaks will jump to. This isn’t trivial, and this is one of the places where we currently break from graph theory a bit and take advantage of the fact that SCI byte code always proceeds forward in terms of memory addresses. This is also an occasional failure point of the current decompiler.

Once the follow node for the loop has been determined, we can then follow its predecessors, and include any that are dominated by the loop header.

Switch statements

The next control structures we attempt to find are switch statements. Switch statements have a distinct instruction pattern in SCI.

A copy of the value of the switch expression is kept on the stack, and this value is duplicated onto the stack again (using the DUP opcode) for each case. Finally, the TOSS opcode is issued to pop the value from the stack at the exit of the switch statement.

The TOSS opcode is the most distinctive thing here – switch statements are the only place this is used in SCI. So the first step is to find a node that starts with a TOSS.

Consider the following method:

	(method (edgeToRoom theEdgeHit)
		(switch theEdgeHit
			(EDGE_TOP north)
			(EDGE_RIGHT east)
			(EDGE_BOTTOM south)
			(EDGE_LEFT west)
		)
	)

Which is represented by the following disassembly:

    (method (edgeToRoom) // method_0f05
  0f05:8f 01              lsp param1      // the switch value
  0f07:3c                 dup             // we dupe it on the stack for each case
  0f08:35 01              ldi 1           // the case value
  0f0a:1a                 eq? 
  0f0b:31 04              bnt code_0f11   // branch to next case
  0f0d:63 2a             pToa north 
  0f0f:33 1c              jmp code_0f2d   // jump to switch exit

        code_0f11
  0f11:3c                 dup             // duping the switch value for the next case
  0f12:35 02              ldi 2           // the case value
  0f14:1a                 eq? 
  0f15:31 04              bnt code_0f1b   // branch to next case, and so on...
  0f17:63 2c             pToa east 
  0f19:33 12              jmp code_0f2d 

        code_0f1b
  0f1b:3c                 dup 
  0f1c:35 03              ldi 3 
  0f1e:1a                 eq? 
  0f1f:31 04              bnt code_0f25 
  0f21:63 2e             pToa south 
  0f23:33 08              jmp code_0f2d 

        code_0f25
  0f25:3c                 dup 
  0f26:35 04              ldi 4 
  0f28:1a                 eq? 
  0f29:31 02              bnt code_0f2d 
  0f2b:63 30             pToa west 

        code_0f2d
  0f2d:3a                toss             // Throw away the switch value on the stack
  0f2e:48                 ret             // since it's no longer needed.
    )


This is represented by the following control flow graph:


SwitchRaw


When we find the node that starts with a TOSS, we can enumerate all its predecessors until we find one that dominates it (i.e. all paths that reach the TOSS node go through that node). The predecessor of that node will be the head node of the switch statement.

Once we have the collection of nodes that comprise the switch statement, we can then proceed to determine the case nodes. We assume the cases follow a pattern like so:

  • a DUP instruction
  • [some expression that puts a value into the accumulator]
  • an EQ? instruction (comparing the switch value to the case expression)
  • a BNT instruction to the next case

Proceeding forward from the switch head, and following the “else” paths of each branch node, we can determine the beginning nodes of each case statement. To find the ends, we can look for predecessors of the TOSS node that are dominated by the case heads.

The final node structure for the function above might look like this:


SwitchFinal


Compound conditions

Next, we look for patterns that represent compound conditions (e.g. if (A and B)). In the Cifuentes paper, it is shown that shortcircuited compound conditions can be reduced to one of four different patterns that represent the following cases:

  • A or B
  • A and B
  • (not A) or B
  • (not A) and B

In assembly, these would correspond to the 4 variations of the following pattern:

		expression A
		bt/bnt then/else
		expression B
		bnt else	

The Cifuentes paper uses the following diagram to list these out and show the 4 branching possibilities:


CC


More complex boolean expressions end up just being nested compound conditions, so we repeat this pattern-finding iteratively (each time grouping the relevant nodes under a “compound condition” semantic node) until no more compound conditions are found.

Some fixup

As this point, we do some fixing up of our control flow graph. Of concern are the patterns for break and continue statements in loops. These break the natural flow of the program and will interfere with our if statement detection.

Fundamentally, an if statement pattern is defined by a header node with two branches, where each branch has a common follow node that is dominated by the header node (i.e., all paths to the follow node pass through the header node). The basic control flow for if-then and if-then-else are shown below:


IfStatementTypes


If the if-statement body contains a break or a continue, then the recognizable pattern won’t be preserved. Consider the following loop:

	(while temp0
		(Prints "A")
		(-- temp0)
		(if (== temp0 4)
			(break)
		)
		(Prints "B")
	)


Though it contains an if-statement, we don’t see the if-statement pattern we want in the control flow graph that we’ve constructed for its disassembly:


One branch of the if-break node leads to the loop exit. The if-statement doesn't have an easily recognizable pattern.

One branch of the if-break node leads to the loop exit. The if-statement doesn’t have an easily recognizable pattern.


So we look for jumps to the loop exits (or to the loop header), and replace them with “semantic” break nodes (or continue nodes) and make the subsequent code be their successor node:


A semantic break node has been inserted, and we now have a recognizable if-then pattern.

A semantic break node has been inserted, and we now have a recognizable if-then pattern (if you’ll pardon the .svg renderer shifting the graph nodes around a bit).


If statements

If-statements are the last control structures we determine. We do them last because other control structures like loops and switch statements might have patterns within them that we would incorrectly detect as if-statements. By doing them last, we ensure that we correctly identify those other control structures.

The if-then and if-then-else patterns were described in the previous section. With those recognized, the previous example becomes something like this:

The If statement has been recognized and substituted in the loop body.

The If statement has been recognized and substituted in the loop body.


Summary…

After this major step of control flow analysis is done, we end up with a much more semantically meaningful graph of the function. It consists of the following types of nodes:

  • raw code (sequences of instructions)
  • compound conditions
  • break/continue nodes
  • loops
  • switches/cases
  • ifs

During processing, each of these nodes has had some of its child nodes semantically tagged. For instance, compound conditions have one of their children marked as “first”, and the other as “second”. Ifs have one of their children tagged as “then”, and possibly another as “else” (to indicate which nodes begin the bodies of the then and else clauses), and another marked to indicate it is the condition node.

At this point we have a good idea what the final structure of the function source code will look like, but we’re still far from done.

The control flow graph for the makeARock method on the CliffRoom object in King Quest 6's script 21.

The complete control flow graph for the makeARock method on the CliffRoom object in King Quest 6’s script 21.


The above graph ended up getting decompiled into the following source code:

(method (makeARock)
	(if (== rockCount maxRocks)
		(if (== gArrayScriptGetValue 300)
			(gKq6Messager say: 8 5 18 2 0 21)
		)
		((global2 script?) cue:)
	else
		(ShakeScreen 1 (Random 0 2))
		(global104 number: 300 setLoop: 1 play:)
		(if (> rockCount 0)
			([newRockStep (- rockCount 1)] stopUpd:)
		)
		((= [newRockStep rockCount] (RockStep new:))
			x:
				(cond 
					((== gArrayScriptGetValue 300) [local278 rockCount])
					(flipRocks (- 320 [local246 rockCount]))
					(else [local246 rockCount])
				)
			y:
				(if (== gArrayScriptGetValue 300)
					[local287 rockCount]
				else
					[local262 rockCount]
				)
			cel:
				(if
					(or
						(== global12 130)
						(== global12 340)
						(== global12 370)
					)
					2
				else
					0
				)
			rockPointer: rockCount
			corner:
				(cond 
					(
					(and (== rockCount 3) (== gArrayScriptGetValue 300)) 1)
					(
						(and
							(or (== rockCount 6) (== rockCount 11))
							(== gArrayScriptGetValue 320)
						)
						1
					)
					(else 0)
				)
			capStone:
				(if
					(or
						(and (== rockCount 14) (== gArrayScriptGetValue 320))
						(and (== rockCount 7) (== gArrayScriptGetValue 300))
					)
					1
				else
					0
				)
			init:
			setCycle: End RockStep
		)
		(self rockCount: (+ (self rockCount?) 1))
	)
)

The next step we’ll look at in the decompilation process is Instruction Consumption.

7 Comments

Decompiling SCI byte code – part 1

SCI is the Sierra Creative Interpreter – the scripting language and runtime on which Sierra’s adventure games were built between roughly 1988 and 1996.

As part of the SCI Companion project (an IDE for SCI) I worked on over the past year, I wrote a decompiler. In this series of posts I’ll go over the process of generating source code from compiled byte code, and the technical challenges and limitations of doing so.

A good reference for SCI byte code is this page in the ScummVM wiki.

This post is part 1 of the series. Here are links to the rest:

Decompiler

In contrast to a disassembler, implementing a decompiler is quite a task. A disassembler is basically just assembly language with symbol lookups. That is, a direct listing of the byte code but with textual opcodes and the operand numbers replaced with variable names, literals or object names where possible.

The raw byte code for this method.

The raw byte code for the Head::showSelf method in Space Quest 1 VGA


HeadShowSelf

Disassembly from SV (Sierra Viewer) for the Head::showSelf method in Space Quest 1 VGA. With some patience it’s possible to understand what this method is doing, but it’s very slow-going.


A decompiler, on the other hand, attempts to recover the higher level code structure: if statements, loops, switch statements and so on. In addition, some work is done to generate meaningful variable names where possible.


SourceCode

SCI Companion’s decompiled source code generated for the Head::showSelf method.


Compared to a more generic x86 decompiler, say, decompiling SCI byte code is easier. SCI byte code and script resources actually have a decent amount of “original information” in them. It is probably comparable to that of CIL (what C# and other .net languages compile to), and certainly much more than compiled native x86 code, for instance.

We can retrieve the following information from the compiled script resources:

  • class and instance names
  • method names (both for calls and implementations)
  • property names

Some things whose original names are not retrievable are:

  • temporary variables, script and global variables, function parameters
  • procedures (i.e. functions that exist outside an object)

For many of these items we can make reasonable guesses though.

SCI byte code also has the advantage of being generated by a single compiler (at least for the original Sierra games – not for fan games). This means patterns of instructions representing a particular higher level construct will generally be similar. For instance, there is a very distinct pattern for switch statements.

Start to finish

The starting point is the SCI script resources. These contain code logic, class and instance definitions, strings, and script variables. Different versions of SCI use different formats for script resources, but my resource loader loads each into a single runtime format so it can be interacted with in a consistent way.

The ending point is an abstract syntax tree describing the entire script file. This is a tree of code constructs like if statements, loops, and function calls. From here, I can run the AST through a syntax formatter that outputs the source code in one of two (currently) source code languages (I also had a c++ style source code I was working on for a while, but I abandoned that).


Determining code boundaries

The first step is to determine the boundaries of a function. SCI script resources can have public procedures and objects with methods. In each of these cases, an offset to the beginning of the method is provided. There is no end point or code size given, other than the total length of the entire script resource. We can try to determine end points by keeping track of where other chunks of data in the script resource begin, but that method isn’t always reliable.

Instead, to determine where a function ends, we can look for a RET opcode (return), which returns control to the calling function. However, RET can appear in the middle of a function too. So we actually need to look at all the branching instructions to keep track of the “furthest” point to which we have branched. If we encounter a RET instruction that is after any branch target, then we know we’ve reached the end of the function. Some corrupt scripts don’t satisfy this condition, and so this is a possible point of failure for decompilation.

At this point, it might be worth pointing out that SCI’s limited scope and having knowledge of the compiler originally used helps us out. For instance, a generic x86 decompiler would be a much more difficult task, since function code may not be laid out in sequence in memory. However, for SCI we know this to be true. We’ll never encounter a function that jumps to another arbitrary place in memory, so we can always assume that if there are no branch targets beyond a RET instruction we’ve encountered, that it must be the end of the function.


Determining the boundary for the Collect::eachElementDo method. There's a RET in the middle of the function, but we know there is a branch instruction that points after the RET - so the first RET doesn't signal the end of the function.

Determining the boundary for the Collect::eachElementDo method. There’s a RET in the middle of the function, but we know there is a branch instruction that points after the RET – so the first RET doesn’t signal the end of the function.


One final challenge here is that SCI also supports local procedures in the script resources. For these (unlike public procedures and methods), we have no entry point listed anywhere in the script resource. Instead, we need to scan all bytecode for CALL opcodes, and put together a list of the call target addresses. These would be our entry points for local procedures.

After all this work is done, we have a set of start/end points for the code segments (functions) that we need to decompile.

Partitioning code into blocks

In order to perform control flow analysis (the most difficult step of decompilation), we need to distill the instructions down to some fundamental nodes that we can use in our analysis.

The interesting boundaries for control flow are the branch instructions (bnt, bt and jmp) within the code segments. Boundaries are also defined by the targets of branch instructions.

Let’s take a look at this piece of script:

;;; Sierra Script 1.0 - (do not remove this comment)
(script# 19)

(use Main)
(use Print)

(public
	SomeProc 0
)

(procedure (SomeProc &tmp someVar anotherVar)
	(= someVar 11)
	(= anotherVar 0)
	(if (== gRoomNumber 13)
		(Prints "Blah")
		(while (> someVar 0)
			(Printf "Count: %d" someVar)
			(if (== 0 (mod anotherVar 2))
				(++ anotherVar)
			)
			(-- someVar)
		)
	)
)


Here’s the assembly that would correspond to this script, annotated to indicate where the boundaries are between sequences of instructions that comprise “nodes” that are interesting for control flow.

/ EXPORTED procedure #0 (SomeProc)
(procedure proc_000a
  000a:3f 02             link 2 // (var $2)
  000c:35 0b              ldi b 
  000e:a5 00              sat temp0 
  0010:35 00              ldi 0 
  0012:a5 01              sat temp1 
  0014:89 0b              lsg gRoomNumber 
  0016:35 0d              ldi d 
  0018:1a                 eq? 
  0019:31 2c              bnt code_0047 
-------------- BOUNDARY
  001b:78               push1 
  001c:74 0006          lofss $0006 // Blah
  001f:46 0399 0000 02  calle 399 procedure_0000 2 // Prints 
-------------- BOUNDARY
        code_0025
  0025:8d 00              lst temp0 
  0027:35 00              ldi 0 
  0029:1e                 gt? 
  002a:31 1b              bnt code_0047 
-------------- BOUNDARY
  002c:7a               push2 
  002d:74 000b          lofss $000b // Count: %d
  0030:8d 00              lst temp0 
  0032:46 0399 0001 04  calle 399 procedure_0001 4 // Printf 

  0038:76               push0 
  0039:8d 01              lst temp1 
  003b:35 02              ldi 2 
  003d:0a                 mod 
  003e:1a                 eq? 
  003f:31 02              bnt code_0043 
-------------- BOUNDARY
  0041:c5 01              +at temp1 
-------------- BOUNDARY
        code_0043
  0043:e5 00              -at temp0 
  0045:33 de              jmp code_0025 
-------------- BOUNDARY
        code_0047
  0047:48                 ret 
)


This is easier to visualize in graph form. The nodes in the graph are marked by their address in the script resource, followed by the list of assembly instructions that are part of that node:


RawControlFlowGraph


You’ll note that we have created one extra node in this graph: the beginning of the set of instructions that lead up to the first if statement have also been marked as a boundary. This is a sort of tweak that will make it easier to distinguish if statements with compound conditions vs nested if statements that have code between the if statements that isn’t part of the 2nd if’s condition.

These graphs form the basis of the next step, control flow analysis.


Leave a comment

Week Of Awesome – port mortem for “When It’s Dark”

Click here to play the game in the Unity web player

Sunday night we got the theme: “The toys are alive!”. My first thought was a game that involved toys that move only when no one is looking – a kind of creepy thing. I tend to lean heavily towards puzzle games, so I spent time figuring out what puzzles might arise from that. Finally, I have recently played a few indie games that use an isometric grid-based 3d world (Monument Valley and Back to Bed – not a big fan of Back to Bed so far though), so that was going to be my inspiration for the visuals.

Working with light probes in Unity

Working with light probes in Unity

I had spent the previous 3 days or so playing around with Unity, so I felt ready to tackle my first Unity project. Some of my goals during the competition were:

  • Use this as an opportunity to become really familiar with Unity.
  • Make a complete, if short, game. I wanted a complete end-to-end thought-out experience. So I was careful to scope the size of the game so that I could complete it in time.
  • I wanted to do something with visual impact. It’s a challenge to do this with my limited artistic abilities.

Timeline

First, I’ll give an overview of what I spent each of the 7 days on. I feel like I had a pretty successful game jam, so maybe there is some interesting info here?

  1. Basic environment setup. I made a small test level mesh in Blender, got it into Unity. I found a suitable animated player model and implemented player movement. Just the basics. I also thought about the gameplay mechanics I wanted.
  2. Basic game mechanics. I got most of the gameplay mechanics working, so I basically had a prototype of what the game would feel like. This ensured me, by the end of day 2, that everything I wanted to do was feasible.
  3. Demo -> Game. I worked on overall stuff that made it a game and not just a demo: main menu, sequence from one level to another, etc..
  4. Level design. I started level design – 3 basic “tutorialish” levels – and came up with a workflow to take me from design on paper to a functioning level in Unity
  5. Level design. My goal for day 5 was to have an essentially complete game that could be released as is. This day was all about level design. I designed 4 more levels, and cut myself off at this point. There were some new mechanics I really wanted to try out, but I forced myself to say “this is complete”. I also came up with an ending to the game, and implemented that as a final “cutscene” level.
  6. Lighting. I worked on visuals. Essentially I wanted to bake lighting into the game so I could have global illumination with lots of lights, instead of just the harshness of a directional light or two. The visual aspect of the game took a great leap.
  7. Polish. I worked on minor polish for about 9 hours, after making sure I had functional “backup” builds working.

One notable thing is that there was no “audio” day or “graphics” day or anything (except for the light mapping on day 6, but that was a new thing for me, so I had to spend a lot of time on it). I basically worked on the audio and visual art throughout the 7 days. I like to intersperse this work throughout – switching tasks periodically helps me with motivation. I might be getting frustrated by something, but then I put in some new sounds, or a new model. Suddenly the game looks fresh and better and I get more excited about it!

Gameplay brainstorming from early on

Gameplay brainstorming from early on

What went well

Unity

The main thing that went well was using the Unity game engine. After spending so long with XNA and MonoGame, it was a pleasure to get things up and running so quickly.

  • Models generally imported with no problems (unless the models themselves were corrupted, more on that later), and animations were easy to set up
  • Very simple to get robust physics set up
  • No audio headaches like I’ve had with XNA and MonoGame
  • Everything worked on every platform I tried with pretty much no changes (PC, and the Unity web player on both PC and Mac OS). In contrast, with MonoGame there was a significant amount of fiddling with things like texture formats in order to get stuff working on different platforms. I kept being surprised by how everything “just worked”.
  • Unity has some great tutorials available for it, and there is so much support and information out there.
  • Player state (which in my game just consists of what level has been completed) is trivial to setup. Like about a minute of work for what would be maybe half an hour in XNA. Little things like this are nice – I noticed how many other game jam entries don’t save player state.

Scheduling

I feel I scheduled my time pretty well. I was careful to not work too hard during the first four or five days to keep my energy up. I got “enough” sleep, but not as much as I wanted. The only time I really questioned whether I would get something done was with the lightmapping on day 6. But it was not essential to the finished product.

Audio

I was able to find all the audio clips I needed (and music) from soundsnap.com, and in some cases from stuff I had recorded. For instance, the footstep sounds are part of my personal audio recordings collection. I cleaned up the sounds in Sony Vegas, and then plop them into the game.

Preparing footstep sounds from a raw recording in Sony Vegas

Preparing footstep sounds from a raw recording in Sony Vegas

One small flaw I see in Unity is the lack of sound design support. I know people often hate on XACT (which is one of the audio solutions for XNA), but it really is nice to be able to assemble sounds in a sound design app and then expose a series of knobs to tweak by the programmer. In Unity everything has to be done in code. One example is playing a random different footstep sound each time. There’s no reason this should need to be done in code – it should be part of the sound definition itself.

Visual design

Even though I’m no graphic design or artist, I am pleased with the way the game turned out visually. The main parts of the level are just cubes/squares/whatever. I wrote code to give them the proper UV channels (I seem to be forever clueless about UV unwrapping in Blender) and applied a very “spartan” texture in Unity. This, combined with lightmapping support from Unity, gives me a look I’m fairly pleased with. It can be hard for someone like me to come up with a consistent art style, but keeping things simple helps. Given that most of my world was done “programmatically”, I needed few models. I only purchased/acquired 5 of them I think.

Reflectors used for the sconces.

My game levels don’t have a ceiling, but I wanted to simulate light from the sconces bouncing off the ceiling onto the walls. I placed small quads above the sconces facing downward (invisible from above). Seemed to do the job.

Atmosphere

I’m pleased with the alternate relaxing/horror atmosphere I gave the game. Sometimes something terrible has apparently happened, but everything seems just hunky dory.

Game ending

I didn’t think of the game ending until day 5, so I suppose this was kind of fortuitous. But I think it ties it all together nicely. It was kind of random luck that I thought of the “twist”, I suppose.

Minimal UI

I’m a fan of making games with minimal UI, and I think the time it saves in tight deadlines like this is definitely an asset. The goal is that players can just figure out the game by playing it, without needing any tutorials.

What went wrong

Mechanics

In terms of game mechanics, I’m not 100% satisfied with what I came up with. I still think there could be some more fun mechanics in there. I feel I may have locked myself into certain gameplay elements too early. They say come up with 5 designs and then throw them all out and come up with another. I didn’t do that – I basically went with the first idea I got. In the end, I feel my game has more of a visual/atmosphere impact than a gameplay impact. Maybe that’s fine, but I still think I could have done better. I mean turning the lights and having the toys only move when it’s dark – it doesn’t really add anything to the gameplay. It just makes it a bit annoying (but it does add to the creepy atmosphere of the game). The other thing I’m not satisfied with is that while solving the puzzles you can get into an impossible-to-win situation, so you need to restart the level. It’s not a huge deal since the levels are small, but something like a rewind functionality could help this (not trivial to implement). When I saw this was frequent enough, I tried to write logic to detect when things have “gone bad” and automatically pops up a “reload level” button. Unfortunately I can’t detect all cases.

Oops, you needed that bear!

Oops, you needed that bear!

Play-testing

I was able to get very little feedback. Near the end when I was closer to shipping, I did get some friends to try it out. At least one of them – once they caught on and got to the later levels – seemed to really enjoy it.

Corrupted models

Nearly every model I downloaded from the web (even those I paid for) had problems. Often the transforms for the individual pieces would be wrong (IMG solider), or half the normals would be inside out. I had to fix up most of the models in Blender. Speaking of which,

Blender

I know it’s free (so I shouldn’t complain), but I really do have a love/hate relationship with it. The UI just seems to fight against what I want to do. I’m a big fan of standard user interfaces, and Blender just seems so counter-intuitive no matter how familiar I get with it. It’s also remarkably hard to find documentation, despite how widely used it is.

Code decay

Near the end I started slapping together scripts with more abandon. I suppose this isn’t too big a deal near the end of a gamejam project, but it did result in a some bugs, and some things that ended up being slightly more difficult-to-implement near the end. For example, I think I had 3 separate scripts trying to control the camera, and stomping each other. Part of this just comes from my inexperience with Unity and when to use which way (traverse hierarchy by name, search by tag, provide a gameobject instance to the script in the editor etc…) to access game objects. In the end this wasn’t a huge deal though.

Challenges

Here I’ll talk about some of the design challenges I faced.

Level geometry

I needed platforms to walk on, walls, and collision boundaries for the level. Fundamentally, everything could be inferred from a simple tile map that contained floors and walls. I wasn’t sure at first how to do that in Unity. I found the documentation for the class that lets you build meshes at runtime. But I wanted my level to be visible in the editor too. There’s probably a way to do this, but I ended up going with a solution where I modeled the level in Blender (I at least know how to extrude cubes, split faces from objects and such).

Basic geometry in Blender, and what it looks like imported into Unity with other game elements.

Basic geometry in Blender, and what it looks like imported into Unity with other game elements.

I only needed very simple texturing on the level geometry – basically, UVs projected along the x, y and z axes. I wasted a bit of time trying to do UV-unwrapping in Blender, but this just seemed over-complicated for what I wanted to do. I contemplated writing a shader in Unity that would calculate UVs based on world position. But I didn’t feel like delving into custom Unity shaders in the middle of a gamejam. In the end I wrote a Blender script that projects UV coordinates onto objects based on the face normals.

Tiled floor pattern I made using a desaturated texture generated with MapZone, and processed with photoshop

Tiled floor pattern I made using a desaturated texture generated with MapZone, and processed with photoshop

Script I wrote in Blender to calculate projected UV coordinates for the x, y and z axes:

import bpy

me = bpy.context.object.data
uv_layer = me.uv_layers.active.data
vertices = me.vertices

textureScale = 0.5
textureOffset = 0.5

for poly in me.polygons:
 print("Polygon index: %d, length: %d" % (poly.index, poly.loop_total))

 # range is used here to show how the polygons reference loops,
 # for convenience 'poly.loop_indices' can be used instead.
 for loop_index in range(poly.loop_start, poly.loop_start + poly.loop_total):
 print(" Vertex: %d" % me.loops[loop_index].vertex_index)
 vIndex = me.loops[loop_index].vertex_index
 theNormal = vertices[vIndex].normal
 pos = vertices[vIndex].co
 print(" Pos: %r" % pos)
 print(" norm: %r" % theNormal) 
 
 uvProj = (0,0)
 
 #figure out which direction the normal faces.
 if theNormal.x > theNormal.y:
 if theNormal.z > theNormal.x:
 # faces z direction
 uvProj = (pos.x * textureScale + textureOffset, pos.y * textureScale + textureOffset)
 else:
 # faces x direction
 uvProj = (pos.y * textureScale + textureOffset, pos.z * textureScale + textureOffset)
 else:
 if theNormal.z > theNormal.y:
 # faces z direction
 uvProj = (pos.x * textureScale + textureOffset, pos.y * textureScale + textureOffset)
 else:
 # faces y direction
 uvProj = (pos.x * textureScale + textureOffset, pos.z * textureScale + textureOffset)


 print("Old UV: %r" % uv_layer[loop_index].uv)
 uv_layer[loop_index].uv = uvProj
 print("New UV: %r" % uv_layer[loop_index].uv)

Movement and physics

My game design presented a challenge because I wanted both a fully 3d physics-based world, but also wanted discrete tile-based movement for the toys in the game. I debated whether or not to have some grid-based store of the current game state (enforcing one game entity at each square, for instance). I’m not a huge fan of duplicated state though, so I decided to just leverage the physics system. So when doing my discrete movement I decided to just perform raycasts one world unit in the appropriate direction and see if anything was it. This does have the advantage that things like opened/closed door blocking things “just works”. However, I did encounter issues with ray casts missing things, and casting from the wrong position (for some models, their transform position lay under the platform).

Movement is continuous for the player (on the right), but discrete for the other game objects.

Movement is continuous for the player (on the right), but discrete for the other game objects.

I ended up having to use sphere casts instead of raycasts, and being very careful to adjust the start point of the cast to an appropriate level about the ground. Overall it’s not a very robust system, so I would probably change it if I continue development on this game.

Visual indicators

When the lights are off, you can hear the bear moving. Some people don’t play with audio, or can’t hear it. In that case I wanted some visual indicator that corresponded to the bears’ movement, so that the player doesn’t need to guess how far they’ve moved. I had a lot of trouble coming up with a good design for this. At first I had dots across the bottom of the screen, but that ruined the immersive experience I thought. In the end I have a subtle spotlight on the player that rotates. One rotation is one bear step. It’s not very obvious though. In the updated version the spotlight pulses in addition to rotating. That’s a bit more obvious but it’s still not ideal.

Things I wanted to get done and bugs

Additional mechanics

Some additional mechanics I wanted to try were:

  • The player can point a light beam or move some glowing object around. It would stay lit when the lights go off, and would prevent bears (or whatever) from moving across its path. In the end I decided that I already had something that prevented bears from moving across an area (the soldiers), so I decided the extra implementation time wasn’t worth the possible extra puzzles
  • A bear or toy that moves towards the player when the lights are off, and kills him if it reaches him.

I would also like to perhaps have something else happening while the lights are off (i.e. instead of the player just waiting).

Bugs

The final submission for the competition had a few bugs. One made it possible to not be able to turn the light switch on again (the player movement is frozen when the lights are off). I couldn’t reproduce it, but it happened to a friend a few times. The light switch trigger depended on the position and direction of the player, and even though I stopped the player in his tracks when the light switch went off, I think due to update order there is a possibility that the player moves out of position the next frame. This wasn’t a robust way to do things, and I’ve fixed it in the updated version. Another bug was the lighting on the bear. I noticed in certain areas it was just not lit correctly. Have a look:   PM1   The lighting just seems flat and out of whack with the surroundings. The static objects are lightmapped, which means I’ve baked the global illumination into lightmap textures for the objects. As a result, no dynamic lighting is applied. This means for dynamic objects, such as the player or bears, we need to use light probes. I knew something was up, but I realize I could look at the light probe cells used by an object until after the compo was over. When I did, for a bear it looked like this:

The bear is using light probes scattered across the level.

The bear is using light probes scattered across the level.

The light probes used were scattered across the level, when they should have been the ones closest to the bear. It took me a while to figure out why. Only the center of the object’s bounding volume is used to determine which light probes are used, not the size. In this case though, that center turned out to be well below the bear, outside of the level volume covered by light probes. I’m not sure exactly why Unity chose those probes, but adjusting the Light Probe Anchor gave me this instead:   PM4   And now the bears look much better:   PM10   Another thing I noticed is that the lighting on my doors looked bad. There isn’t really a way around this with Unity’s current system though. Only a single interpolated light probe value is chosen for the entire mesh, so a flat mesh (like the door) will have the same lighting through out. I could have baked the door into the lightmaps, but then it would have looked incorrect when it was opened. The color of the door is an important gameplay element, so I suppose it’s ok that the lighting isn’t too interesting on it.

Summary

I’m not sure if I’ll continue work on this game – I suppose it might depend on how well it does in the competition. Are the mechanics strong enough to make an interesting game? What other things can I do to make the game interesting? A deeper story? More of an exploratory feel to the world? I know if I continued I’d want to streamline the level generation process (basically have more geometry generated automatically from a simple text file or something). Getting familiar with Unity was definitely a good move career-wise. From a programming perspective though, things are not very challenging. Gameplay programming barely feels like programming. I may look into shader programming in Unity next, because that interests me.

Cascadia Quest blog

Development blog for Cascadia Quest

Space Quest Historian

Hi. I quite like adventure games.

Harebrained Schemes

Developer's blog for IceFall Games

kosmonaut's blog

3d GFX and more

bitsquid: development blog

Developer's blog for IceFall Games

Sean Middleditch Psychic Readings

Developer's blog for IceFall Games

Lost Garden

Developer's blog for IceFall Games

Memories

Developer's blog for IceFall Games

Casey Muratori's Blog

Developer's blog for IceFall Games

Rendering Evolution

Developer's blog for IceFall Games

Simonschreibt.

Developer's blog for IceFall Games

– Woolfe –

Developer's blog for IceFall Games

Clone of Duty: Stonehenge

First Person Shooter coming soon to the XBOX 360

Low Tide Productions

Games and other artsy stuff...

BadCorporateLogo

Just another WordPress.com site

Sipty's Writing

Take a look inside the mind of a game developer.

Jonas Kyratzes

Writer, Director & Game Designer